Show Posts

This section allows you to view all posts made by this member. Note that you can only see posts made in areas you currently have access to.


Messages - kayleigh

Pages: 1 ... 9 10 [11] 12
151
Introductions / Re: Hey!
« on: Jul 09, 2010, 01:05PM »
Nice to see you, Pixel. :D

152
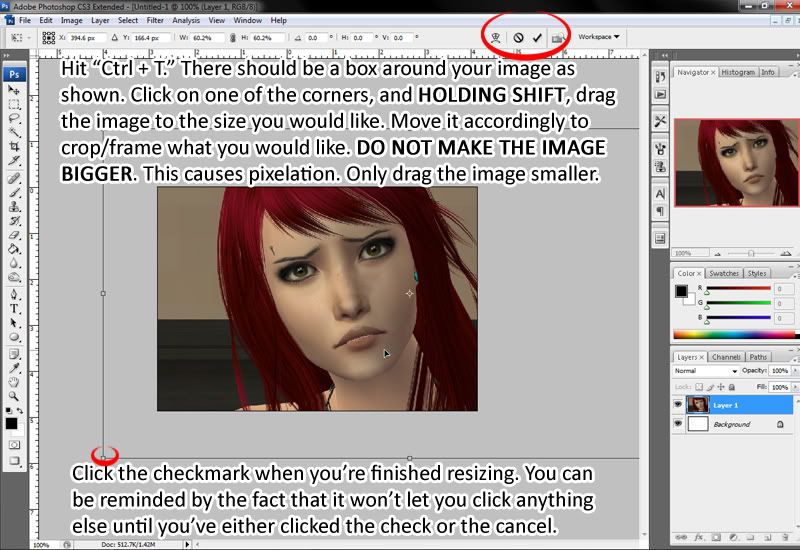
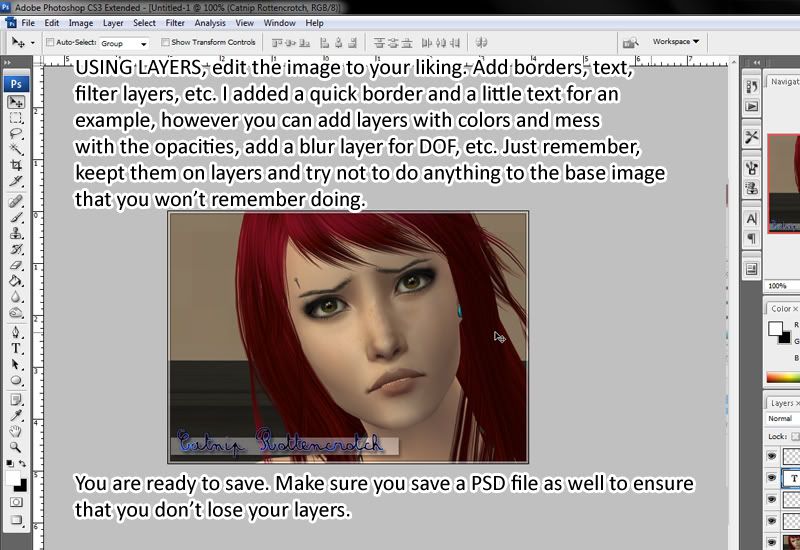
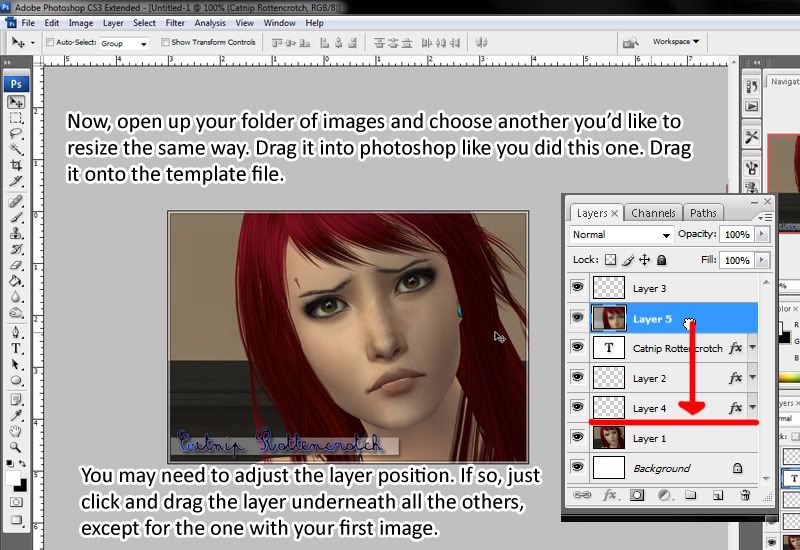
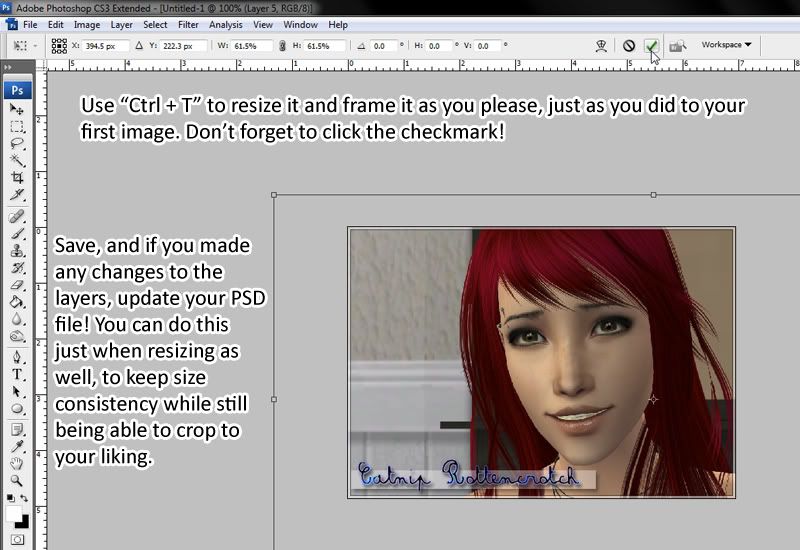
Extracting Content from EPs and SPs
(have the outfits without installing the packs)

Info: Extracting the content from Expansion packs and Stuff packs without having to install the packs. Working Body Shop, access to the EP/SP, and SimPE required.

Warning: Some images may be confusing. Follow the numbers and the text below each image to better help you understand. Read through the tutorial thoroughly before attempting to follow it. Pay close attention to all steps and be sure not to skip anything.


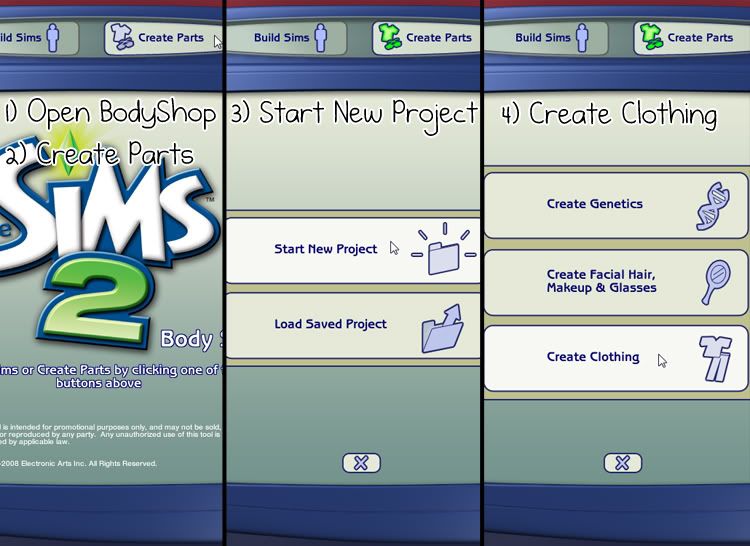
1) Open Body Shop, duh!
2) Choose Create Parts.
3) Choose Start New Project.
4) Choose Create Clothing.


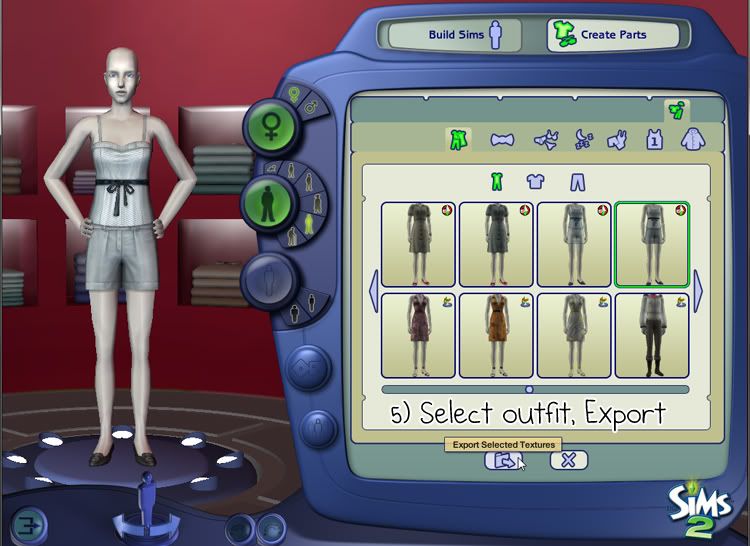
5) Find and Select the outfit you wish to extract. Click the Export Selected Textures button.


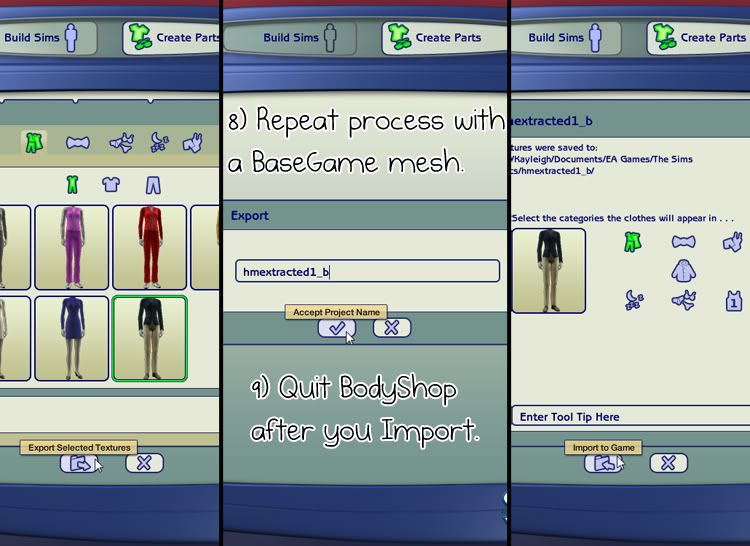
6) Name the project, preferably something that you will remember. I chose "hmextracted1."
7) Do not make any changes to this file. Import directly to game. Add a tooltip if you would like, so you can more easily recognize it, but it isn't necessary. You will be able to delete this file after you have completed all the steps of the tutorial.


8) Repeat the process, only select any Base Game outfit instead. It really doesn't matter which one, this will be the file that we replace in order for the outfit to show up in a game that does not have the EP/SP that it is from. I pulled the scroll bar all the way to the end of the catalog and chose the very last outfit. Just like before, name the project (I named mine "hmextract1_b") and import it directly without making any changes, except adding a possible tooltip. Again, the tooltip is optional and completely up to you.
9) Quit Body Shop. This is necessary because SimPE won't load correctly if TS2 or Body Shop is open. For faster loading time, I would suggest removing your downloads while you extract.


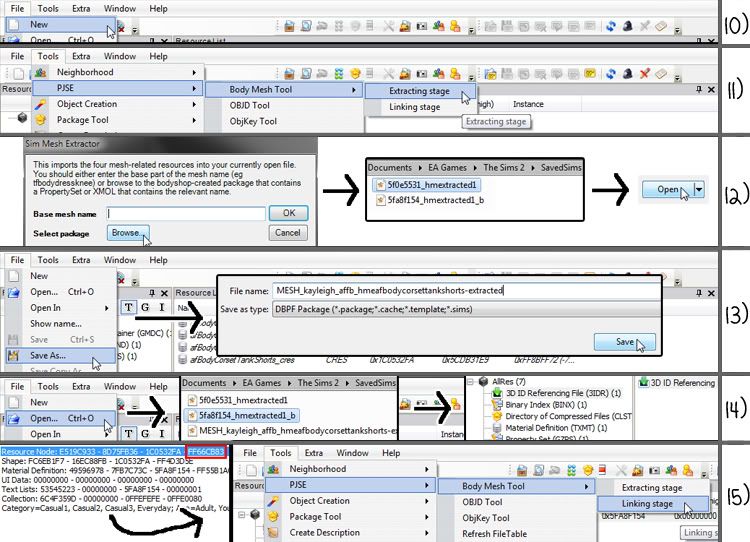
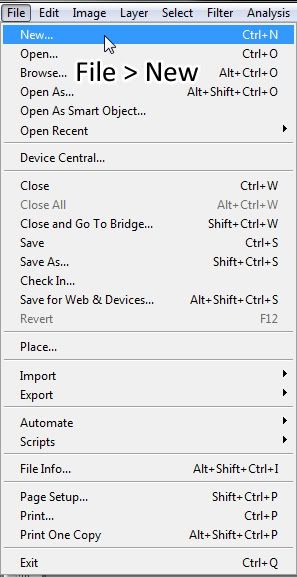
10) Open SimPE. It usually takes a bit of time to load and it WILL make your computer slow, so I would suggest closing out of all your programs except for SimPE. Choose File > New. It will create a blank file for you to work with.
11) In order to gather the pieces of the mesh necessary for the SP outfit to show up, you will have to use the PJSE Extracting Stage tool. Select Tools > PJSE > Body Mesh Tool > Extracting Stage.
12) When the box pops up, select "Browse..." and navigate to your SavedSims folder in My Documents/EA Games/The Sims 2. Select the file with the same name as the FIRST project you made in Body Shop (the outfit you wanted to extract). Since I named my first project "hmextracted1," that is the file I chose. It should make four items show up in the main area: GMDC, GMND, CRES, and SHPE.
13) File > Save As... and name your MESH file. I named mine "MESH_kayleigh_affb_hmafbodycorsettankshorts-extracted."
14) File > Open and choose the file with the same name as the SECOND project you made in Body Shop. I named mine "hmextracted1_b" so that's the file I selected. When the file opens, select the 3D ID Referencing file. Wait for it to load, it could take a few minutes. The loading bar at the bottom will tell you when it's finished. Once it's loaded, make sure "Plugin View" is selected.
15) Take note of the last string of digits on the Resource Node line. Then click Tools > PJSE > Body Mesh Tool > Linking Stage.


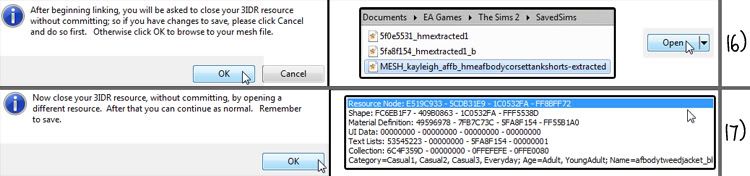
16) When this box pops up, click OK. Then select your MESH file and click Open.
17) Another box will pop up. Click OK. Click on something else in the "AlllRes" menu, then click back on your 3D ID Referencing file. Compare the last digits on your new and old Resource Nodes. If the value changed, continue.


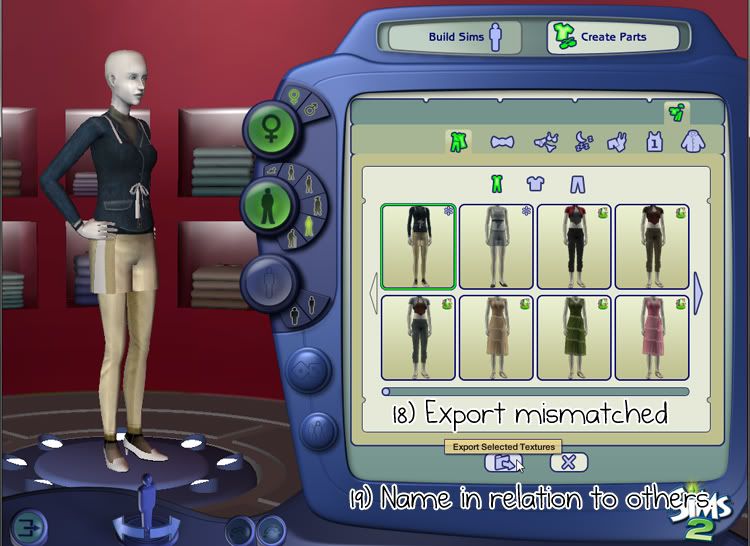
18) Open Bodyshop again. Create parts, New Project, Create Clothing just like before. Select the file with the mismatched textures. It used to look like the suit, but now it looks like the extracted outfit! The only problem is that it still has the suit textures, so we're going to change that.
19) Name it something similar to the names you gave the other two outfits you exported. I named mine "hmextracted1_c" to keep with my naming theme. Naming them something similar helps you to decipher what is related to what.


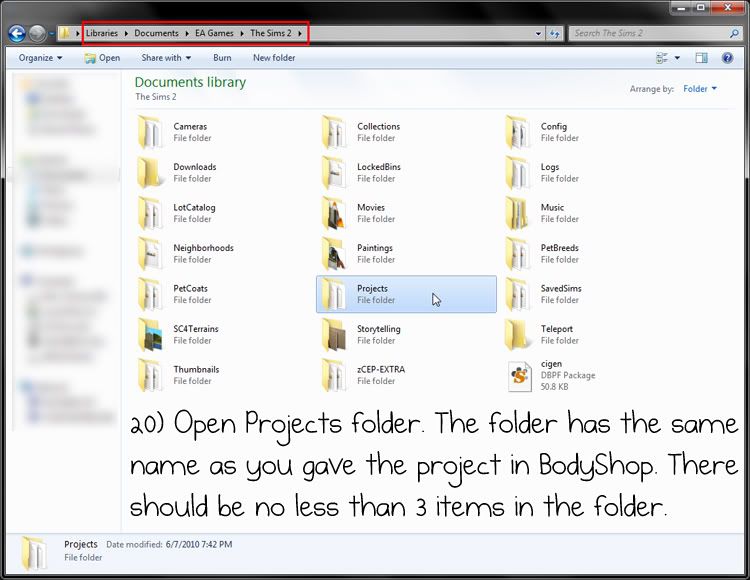
20) Now you need to edit the textures to make it look like the extracted outfit, rather than the suit. Go to My Documents/EA Games/The Sims 2/Projects and open the folder of the most recent project you made. In my case, I would open the folder "hmextracted1_c."


21) Open both of the texture files from the folder you just opened, in an image editing program. Now go back to /Projects and select the folder with the same name as your first export, mine would be "hmextracted1." Open both of those textures as well.
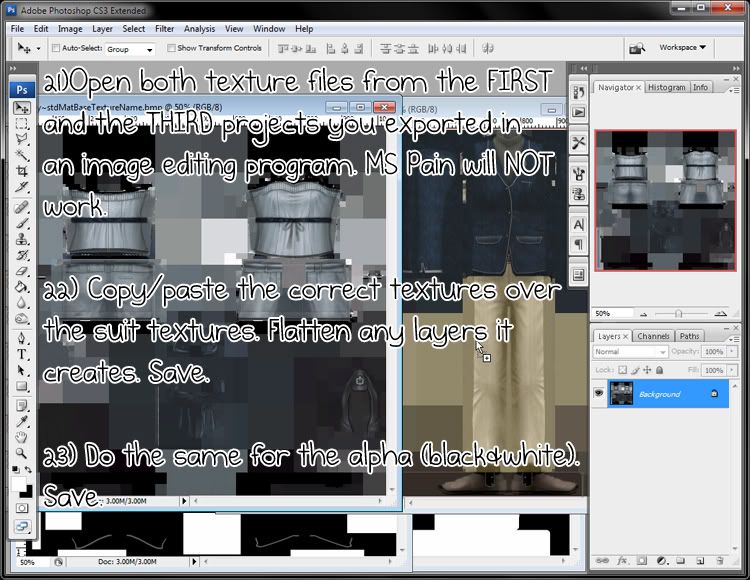
22) Now you should have four textures open in your image editing program. Copy the correct textures (from the outfit you want) and paste them over the suit textures. Flatten the layers so there is only the background. File > Save, and Close both texture files.
23) Do the same as above for the alpha (black and white) textures. Copy the correct textures and paste them over the suit textures. Flatten the layers, Save, and Close.


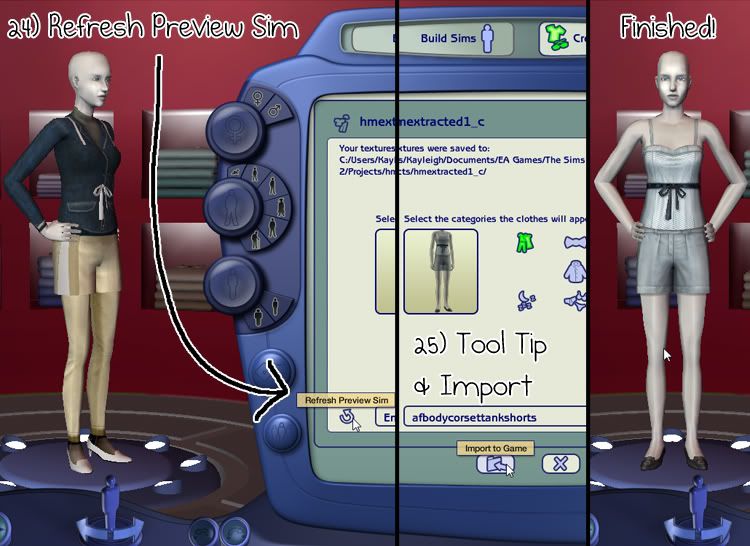
24) Go back to Body Shop and click the Refresh Preview Sim arrow. The outfit on your Sim should look just like the one you planned to extract.
25) Add a tooltip (I used the name of the mesh, "afbodycorsettankshorts") and Import to Game.

Now you're finished with extracting the mesh! You can delete the other two outfits you imported now, you don't need them anymore. You can also delete the project files from the Load Saved Project screen in Body Shop. Simply put the files from SavedSims in the Downloads folder of the game without EPs and SPs. These meshes WILL pick up recolors of the game content.


If you have any questions, please don't hesitate to ask.

153
Creating a Template Image
(keep all images the same size without skewing the proportions)

Info: An easier way to make your group of images the same size without having to mess with cropping or messing up an images proportions. You can also see a good way to save your images here. Photoshop not required but it's what I used in this tutorial.

Warning: Images are random sizes and some are large. I couldn't really figure out a way to make them all the same size without diverting the focus or making them too small. They are pixelated from Photobucket.


File > New


Type in your preferred dimensions, then select "OK." You can do these dimensions in pixels, inches, etc, as long as it represents the size you want your images to be.


This is your "template." You will be using it as a base for all of your images.


Open up the folder that contains your image or group of images. Click on the image you want to resize/crop/edit/etc. Drag it into your program in the background until it makes a + sign with a box (see above). You can also File > Open in your program, or Right click > Open with on your image. However gets it into the editing program is fine.


If the image takes up the full screen, restore it down. It is easier to do this when you can see both your template image and the image you are going to edit, in the window near one another.


Move your images so you can see both your picture and the template image in the window. Choose the select/move tool.


Using the select/move tool, drag your picture onto your template image until you see the same + sign and box as above. You can also copy the picture and paste it onto your template image.


After your image is on the template, maximize it so only your template image is the focus.


Now, HOLDING THE SHIFT KEY, resize your image to your desire using the clickable corners, and use the edges of the template as cropping guides.

!!DO NOT MAKE THE IMAGE BIGGER!! This causes pixelation. Never, ever, ever make images larger than they are. You can't make a tshirt larger than it is without severely mutilating it, so why should you be able to make an image larger than it is?

I know, you understand, but seriously these are the two main things that bug me the most: When people try to make things larger and end up pixelating them and Distorting the portions, which is eliminated by using shift.

So what are the two huge rules about images?
1) HOLD DOWN SHIFT WHEN RESIZING. Only use corners, not sides!
2) DO NOT MAKE THE IMAGE BIGGER. Stretching = Pixelation = Bad.


If all you wished to do was crop images to be the same size, you are finished! If you want each image to have a special mark or border, continue!


USING LAYERS, edit the image to your liking. Add borders, text filter layers, etc. I added a quick border and a little text for an example, however you can add layers with colors and mess with the opacities, add a blur layer for DOF, etc. Just remember keep them on layers and try not to do anything to the base image that you won't remember doing.

Now you are ready to save. Make sure you save a PSD file as well to ensure that you don't lose your layers!


Now, open up your folder of images and choose another you'd like to edit in the same way as the first. Repeat the steps above to put your image in the template file.

You may need to adjust layer position. If so, just click and drag it beneath the layers you wish to keep, but make sure you keep it on top of your first image.


Resize and crop the image using the same method as you did the first, and I drove into your head (DON'TMAKEITBIGGER USESHIFT PLZKTHX). Save, and if you made any changes to your layers, re-save your PSD file!


You can also use this method when only resizing, as I stated before, to keep size consistency while still being able to crop to your liking.


Any questions or concerns, please ask!

154
High-quality Images, Without Large File Sizes
(good for legacies and pic spams)

Info: Have you ever wanted to have really pretty, crisp images, but you don't want people with slow internet to suffer when having to load them? Here's a way to keep the quality but minimize the file size. Photoshop required, however I would think it would be available to use in other programs.

Warning: Images are random sizes and some are large. I couldn't really figure out a way to make them all the same size without diverting the focus or making them too small. They are also pixelated from Photobucket, not from using this method.


When you are ready to save your image, go to File > Save for Web


A window should appear. The top tabs are your viewing options. I'd recommend using 2-up or 4-up. I use 4-up, as you can see.


In the drop down menu on the right, choose JPEG. JPEGs are good for quality and can be very small file sizes.

Contrary to what you may believe, you can also save files in this way if they have transparent pieces. You just have to choose PNG as the format rather than JPEG. Whether you choose 8 or 24 depends on what sort of colors are in your image. If you choose 8 and it doesn't look right, choose 24, simple as that. But please note that choosing 24 causes the file size to be slightly larger, so be sure to choose 8 as often as possible.


Now, in the quality drop down, drag the arrow all the way to 100. Make sure that Optimized is checked.


As you can see, the file size went from 517K to 93.84K.

You are ready to save. I would recommend having a separate folder for your "saved for web" images, so you can still have the unchanged originals. If you have multiple layers in your file, it is ALWAYS a good idea to save a back up PSD file in case you want to make changes! I haven't noticed specifically, but I would assume flattening your image before you save this way makes the file size smaller.


If you have any questions or concerns, please let me know.

155
Random Discussion / Re: Best TV Shows
« on: Jul 09, 2010, 03:51AM »
Yep, this season has wolves. :) They're the legitimate wolf werewolves too, not the dude-turns-into-half-man-half-wolf-thing kind. They change like Sam does. If you've seen that far in, I mean... >_>

156
Introductions / Re: i am so cool
« on: Jul 09, 2010, 03:50AM »
Bahaha hey CZ, welcome. :)

157
Pictures and Things / Re: Pet Pictures
« on: Jul 09, 2010, 03:47AM »
We definitely need some Minion in there, Ja! He's too cute not to post.

Yui, wow, I can't believe Dione has so many toes/claws O.O I saw in one of your pictures how he had really weird looking feet but I didn't realize there were THAT many. xD

Yeah, it's Blackie in my avatar. That's why it's my avatar, because I miss him and that's the avatar I had when he died so I kept it. Here's the original picture it came from, it links to my flickr where there's other pictures of him as well as Sneeps, Snopes and Noodle. And my mom's cat Pretty. And some animals from the shelter I volunteer at.


158
Introductions / Re: O Hay!
« on: Jul 09, 2010, 03:41AM »
Tanananananaaaaaaaa <3

159
Introductions / Re: You know what I like the most?
« on: Jul 09, 2010, 03:41AM »
You're out of the loop, Randall.

160
Introductions / Re: Hey There
« on: Jul 09, 2010, 02:01AM »
Hey Sully!

161
Introductions / Re: You know what I like the most?
« on: Jul 09, 2010, 02:01AM »
CAKEFARTS.

162
Pictures and Things / Re: Pet Pictures
« on: Jul 09, 2010, 02:00AM »
Not at all. I got Blackie from a random "Free Kittens" sign on the side of the road 13 years ago (when I was 6), and I got Little from the animal shelter I volunteer at last year. I just like black cats a lot, and I instantly connected with both of them. I remember when I got Blackie, my mom and brother tried to convince me to get a different one but I refused. And Little was feeling bad after being spayed the day before and was hissing at all the other kittens, but when I held her she purred and was happy. So I knew I had to have her. :)

163
Pictures and Things / Re: Pet Pictures
« on: Jul 09, 2010, 01:35AM »
No, the cat in my icon is my Blackie who died last year. His death is the reason I got Little. So some good came out of it I guess!

164
Random Discussion / Re: Best TV Shows
« on: Jul 09, 2010, 01:34AM »
I don't know, people complain that there's too much sex in it, but I don't have a problem with it. It's not like it's porn or anything. o.O It's got the same amount of sex as movies do nowadays.

I don't know what I like about it. I think I just like having a vampire show to watch. I love vampires too much to not have at least one show about them. And this show isn't bad at all so I'm good with it. xD

165
Pictures and Things / Pet Pictures
« on: Jul 09, 2010, 01:28AM »
Obviously this would be the thread I start. >.> I love showing off Little, and since I got my camera back I'm able to take pictures of her now. :D!


Pages: 1 ... 9 10 [11] 12